Archives

Marcie’s Epilogue

There is a local knitting drive for areas hit hard by the hurricanes. Winter is coming soon and some of the areas get extremely cold. What better way to stay warm than with a hat! I decided it was time to resurrect Marcie’s hat and fix what I became annoyed with in the pattern. I liked how the hat looked when it was done, but it didn’t quite work well in practice. So I picked a new yarn (one from my stash) and double stranded it for added warmth, one of the things I wanted to do with the other hat after the fact, and changed how the decreasing worked the crown of the hat. I’m much happier with the finished product.

_MG_5072

Marcie’s Epilogue

Materials:
1 skein Brown Sheep Lamb’s Pride Worsted (190 yards)

1 pair US 8 Circular Needles
1 set US 8 Double Point Needles

Gauge: 15 st = 4″

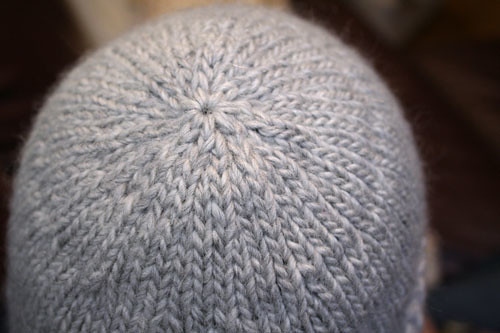
Notes: The hat is knit with two strands of yarn at a time, called double stranding. The bottom part of the hat is seed stitch. That part should be 2 1/2 to 3 inches long, depending on your preference. The hat photographed is knit with 2 1/2 inches of seed stitch. If 61 stitches doesn’t work for your head, simply add more stitches and follow the decrease as written.

_MG_5083

Pattern

  • Using two strands of yarn at once, loosely cast on 61 stitches.
  • Join making sure not to twist and place marker to designate the row.
  • Knit in seed stitch for 2 1/2 to 3 inches depending on your preference ([k1, p1] to the end of the row and ending on a knit. For the subsequent rows, knit the purls and purl the knits.)
  • Knit every row until the piece measures 5 1/2 inches.

Decreasing for the Crown

  • [K2 K2tog] to the last 3 stitches. K3tog
  • Knit another 3/4 inch.
  • [K2tog K1] to end of row. Switch to the double point needles whenever the hat becomes too small for the circulars.
  • K 3 rows (approx 1/4 inch)
  • [K2tog] to end of row.
  • [K2tog] to end of row. You will end up with an extra stitch, just knit the stitch and end the row.

Finishing

Cut yarn leaving a 6″ tail. Thread yarn through a tapestry needle and pull yarn through last 4 stitches. Pull tight. Secure the yarn on the inside of the hat and weave in ends.

Copyright

This is pattern is free for personal, non-commercial use. Further use requires permission from the designer (me). You may not sell or distribute the pattern in any form. You may not sell the any item or items made from this pattern without my permission. You may not use this pattern or items from the pattern for commercial use.

_MG_5073

FO: Charity Shawl

IMG_3696Pattern: My own
Yarn: Not a clue but it is similar to Lion’s Brand Home Spun
Needle: US 15

For Memorial Day Weekend we drove 5 1/2 hours to Maine (oy) and 5 1/2 hours back home (double oy). That is when I made this shawl for Made by Hand. It’s taken me far too long to post about the darn shawl.

This past HanukkaChristmasKwaanzaSolstice our knitting group held a gift exchange. It was amazing how everyone seemed to get exactly what they needed or really wanted. So what did I get? If you had to ask that, you haven’t been reading this blog for that long. Of course I got four skeins of yarn whose information I can no longer find, darn it. Then the problem happened–I had no idea what to do with the yarn. I left it out on display until I could come up with a project, this project in fact.

IMG_3694So for our never ending drive to Maine I thought I would bring the yarn and pray there was enough for a shawl. After a few false starts I successfully casted on and found a pattern I liked in New Hampshire. Then I finished the piece on the drive home. It was fast and easy and I hope someone will love and enjoy it.

Charity Shawl Pattern:

Okay, this is not quite a pattern but here is what I did to create this shawl.

Yarn: Not a clue what this was but it is similar to Lion’s Brand Home Spun
Needle: US 15

Cast on [edited] 1 stitch. Knit each row increasing on the first stitch of the row (for the first row after cast on, that would be increase on the only stitch there). Continue until it’s the size you want. Cast off and weave in ends. Add fringe or other embellishments if you like.

Easy peasy!

Christmas Stocking Tree Ornament Pattern

I’ve tested the pattern several times but may have included a typo transferring from my scribbles to wordpress. Let me know if you run into a typo or if you have questions. I’m not 100% sold on this pattern so try it at your own risk.

The photo below includes the red stocking that is made directly from this pattern and a green stocking that was made trying to create the pattern.

Special Note (and edited to add):
Look into the Jogless Join (aka Jogless Jog, Jogless Stripe) for switching between colors in the round. One example can be found at http://www.socknitters.com/kickback/joglessjog.htm but there are more if you do a google search.

IMG_2915Materials:
[MC] 1 skein in another color
[CC] 1 skein white
*I used both Red Heart Super Saver & Caron Perfect Match for mine and they worked quite nicely.

1 set US 8 Double Point Needles

Gauge: 4 stitches = 1″

Notes:
pm = Place Marker

Pattern

  • Cast on 20 stitches in [CC]. Place 5 stitches on each needle
  • Rows 1-5: [k1 p1] across row
  • Row 6: [p] across row (I find adding the purl row gives you a nice looking fold for the cuff)
  • Row 7: [k1 k2tog k8 k2tog k7] Essentially, we’re knitting stitches 2 & 3 together on needles 1 & 3. You now have 18 stitches left
  • Row 8: [k5 k2tog k7 k2tog k2 ] This time, we’re knitting stitches 2 & 3 together on needles 2 & 4). You now have 16 stitches
  • Switch to [MC]
  • Row 9 – 19: [k] (If my math is off, you should be knitting 11 rows in total including row 9)

IMG_2912Creating the Heel Flap

  • Place the first 7 stitches on 1 needle. We’re going to focus on only these 7 for a while.
  • Switch to [CC]
  • Row 1: [k7]
  • Row 2: [p7]
  • Row 3: [k7]
  • Row 4: [p7]

Turning the Heel

  • Row 1: [S1 k2 k2tog k1] turn the work around
  • Row 2: [S1 p2tog p1] turn
  • Row 3: [S1 k1 k2tog] turn
  • Row 4: [S1 p1 p2tog]
  • 3 stitchs now remain on the heel.

Now it’s time to join the heel back to the rest of the stocking. Starting with the three stitches in the heel…

  • Switch to [MC]
  • Row 1: [S1 k2 pick up 2 stitches down the side of the heel flap k remaining stitches then pick up 2 stitches on other side of the heel flap]
  • Row 2: [k3 k2tog k until 2 stitches are left in the row ssk] (14 stitches remain)
  • Rows 3-6: [k] (this should be 4 rows)
  • Switch to [CC]
  • Row 7: [k]
  • Row 8: [k2tog k2 ssk k1 k2tog k2 ssk k1]
  • Row 9: [k]
  • Row 10: [k2tog ssk k1 k2tog ssk k1]
  • Bind off!

Finishing

Cut yarn leaving a 6″ tail. Thread yarn through a tapestry needle and pull yarn through last 4 stitches. Pull tight. Secure the yarn on the inside of the hat and weave in ends. Attach a hook or create a crochet chain loop so you can hang the stocking from a tree.

FO: Scarf #1

IMG_2944Pattern: My own
Yarn: Baby Alpaca Brush by Plymouth
Needle: US 10

I’ve not been talking much about this scarf because it was a gift for my father-in-law and I feared he may read knitting blog and know it was for him. Unlikely, but possible.

He had often mentioned that he wanted a brown scarf, similar to an unbelievabley soft one the Husband and I bought him years ago, but made with basically lace weight yarn. Instead, we (and by we I mean the Husband) picked out Baby Alpaca Brush by Plymouth and off I went to knit. The yarn is a tan sort of color, but all the pictures make it look a bit yellow and I didn’t have time to color correct.

The yarn is buttery goodness. It is so soft to wear and wonderful to work with. I almost did not want to give the scarf up. My good friend B. also didn’t want to give the yarn up. Every time she entered my house she made a beeline for my yarn pile and proceeded to pet the yarn until she left. Needless to say, I now hide all the good yarn. Needless to say, I bought her a few skeins for Christmas.IMG_2946

The pattern I used is a very basic 2×1 ribbed stitch pattern. I didn’t track gauge because, well, because I was lazy and I don’t have the scarf any more.

Continue reading